A fresh, homemade juice is a vibrant start to any day, but the thought of cleaning your juicer can often dim that healthy glow. Over time, pulp and residue can build up, affecting your juicer’s performance and even posing a hygiene risk. Knowing how to properly disassemble your juicer for a thorough deep clean isn’t just about sparkling parts; it’s about maintaining optimal function, extending your appliance’s lifespan, and ensuring every glass of juice is as pure and delicious as intended. This comprehensive guide will walk you through the process, from preparation to reassembly, helping you keep your juicer in pristine condition.
Why Deep Cleaning Your Juicer Matters for Health and Performance
Regular cleaning is vital, but a deep clean goes beyond the daily rinse. Neglecting to thoroughly clean your juicer can lead to several problems, impacting both your health and the longevity of your appliance. Dried pulp and juice residue can accumulate in hard-to-reach crevices, becoming a breeding ground for bacteria and mold. This not only compromises the hygiene of your fresh juice but can also lead to unpleasant odors and off-flavors. From a performance standpoint, clogged filters and screens reduce juicing efficiency, forcing your motor to work harder and potentially shortening its lifespan. Deep cleaning ensures all components are clear, allowing for maximum juice extraction and a consistently high-quality beverage.
“Incomplete washing doesn’t just compromise your efficiency by blocking the juicing screen, but it leads to pressure buildup, too. This causes internal damage to your juicer.” – Juicernet, on common juicer mistakes
Essential Tools and Preparations for a Thorough Clean
Before you begin disassembling your juicer, gathering the right tools will make the process smoother and more effective. You’ll typically need:
- Mild dish soap: Gentle enough for all removable parts.
- Warm water: Ideal for loosening dried pulp and residue.
- Soft-bristled brush: Many juicers come with a specialized brush, which is particularly useful for cleaning mesh filters and screens.
- Non-abrasive sponge or cloth: For wiping surfaces and less intricate parts.
- Microfiber cloth: Excellent for cleaning the motor base without moisture damage.
- Optional: Baking soda, vinegar, or lemon juice for stubborn stains and odors.
Always start by ensuring your juicer is unplugged from the power outlet to prevent any accidental activation. This is a crucial safety step before handling any internal components. Prepare a sink or large basin with warm, soapy water for soaking, and have a drying rack ready for the cleaned parts.
Step-by-Step Guide to Disassembling Your Juicer
While specific disassembly steps can vary slightly between juicer models and types, a general sequence applies to most. Always consult your juicer’s user manual first, as it provides the most accurate and safe instructions for your specific appliance.
- Remove Juice and Pulp Containers: These are usually the outermost components and can be lifted off easily. Dispose of any remaining pulp.
- Detach the Pusher/Plunger: This piece sits in the feeding chute and is designed to push produce down. It simply lifts out.
- Unlock and Remove the Top Cover/Lid: Depending on your juicer, this might involve unclipping side arms, twisting counter-clockwise to an unlock symbol, or simply lifting it off.
- Carefully Remove the Feeding Chute (if separate): Some models have this integrated with the top cover, while others may require a gentle twist or pull to detach.
- Extract the Filter Basket/Strainer: This is a critical component where most pulp accumulates. In centrifugal juicers, this often contains sharp blades, so handle with extreme care.
- Remove the Auger/Squeezing Screw (Masticating Juicers): For slow juicers, the auger is typically pulled upwards or twisted to release. If it’s stubborn, a gentle wiggle can help.
- Lift the Juicing Bowl/Chamber: Once the internal components are removed, the main processing bowl can usually be lifted off the motor base.
Place all removed parts, except the motor base, into your prepared sink or basin.
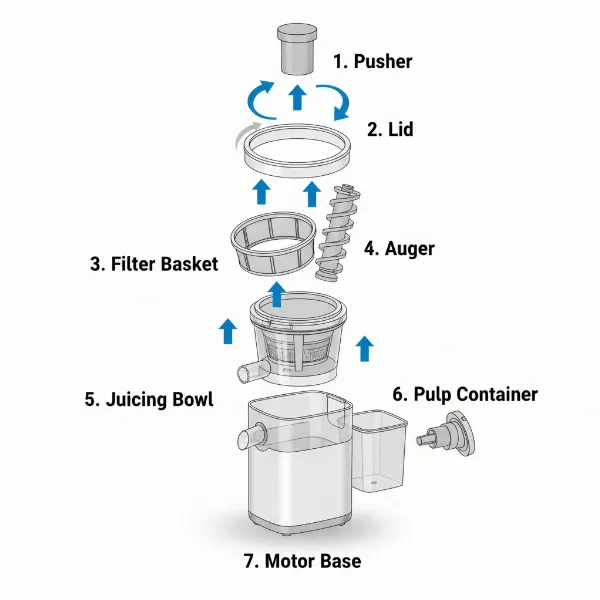 Diagram illustrating the step-by-step disassembly of a typical juicer into its main components.
Disassembly Nuances for Different Juicer Types
Understanding the specific mechanics of your juicer type can simplify disassembly and ensure you don’t damage any components.
Centrifugal Juicers (High-Speed Juicers)
These juicers typically feature a rapidly spinning mesh filter basket with a sharp blade at the base.
- Filter Basket: This is the most crucial part to clean. It often has tiny holes that can become clogged with fibrous pulp. Be especially careful when handling, as the blades are very sharp. Some models may require a specific lever or unlock mechanism to release the basket from its housing.
- Pulp Container: Usually a large container that collects dry pulp expelled from the juicing process.
- Juice Spout/Collector: The part where the extracted juice flows out. This may be integrated or a separate removable piece.
Masticating Juicers (Slow Juicers)
Masticating juicers use a slow-moving auger to crush and press produce.
- Auger/Squeezing Screw: This is the main component that grinds and presses. It typically pulls straight up or twists out. Some augers have a lock feature that requires a specific rotation (e.g., clockwise) to release, especially if the juicer was recently used and still plugged in (sometimes pressing reverse helps unlock it).
- Juicing Screen/Strainer: This often surrounds the auger and is where juice separates from pulp. Its fine mesh can get clogged, similar to centrifugal filters.
- End Cap/Pulp Outlet: The component at the end of the juicing chamber where the dry pulp exits. This often twists off.
- Silicone Gaskets/Wipers: Many masticating juicers have small silicone parts (like wipers or gaskets around the auger) that are removable for thorough cleaning. These are prime spots for pulp to hide.
Citrus Juicers (Manual and Electric)
While simpler, citrus juicers also benefit from deep cleaning.
- Reamer/Cone: The ribbed part that extracts juice from citrus halves. This usually lifts straight off.
- Pulp Filter/Strainer: Sits beneath the reamer to catch seeds and large pulp.
- Juice Collector: The bowl or container that holds the juice.
Deep Cleaning Each Component for Maximum Hygiene
Once disassembled, each part needs proper attention.
- Rinse Immediately: Start by rinsing all removable parts under warm running water to wash away loose pulp before it dries and hardens. This is a crucial step that makes subsequent cleaning much easier.
- Soak Stubborn Parts: For parts with stubborn, dried-on residue, soak them in warm, soapy water for about 10-20 minutes. This helps to loosen any persistent bits.
- Scrub the Filter Basket/Screen: This is often the most challenging part to clean. Use your soft-bristled brush to thoroughly scrub the fine mesh, ensuring all tiny holes are clear. Hold it up to the light to spot any remaining blockages.
- Clean Other Components: Use your brush and sponge with warm, soapy water to clean the auger, covers, containers, and other parts. Pay close attention to corners, grooves, and any gaskets or silicone seals, which can harbor hidden pulp.
- Tackle Stains and Odors:
- Baking Soda: For brownish stains, sprinkle pure baking soda directly onto the stained part or your brush, then scrub. For deep stains, create a paste of baking soda and a little water, apply it, let it sit, then scrub.
- Vinegar/Lemon Juice: A mixture of hot water and 10% lemon juice or white vinegar can effectively loosen stubborn clogs and remove mineral buildup. Soak affected parts in this solution.
- Clean the Motor Base: The motor base contains electrical components and should never be submerged in water. Instead, dampen a microfiber cloth with a vinegar-water solution or mild soap and wipe down the exterior. Use a dry cloth to immediately wipe away any moisture.
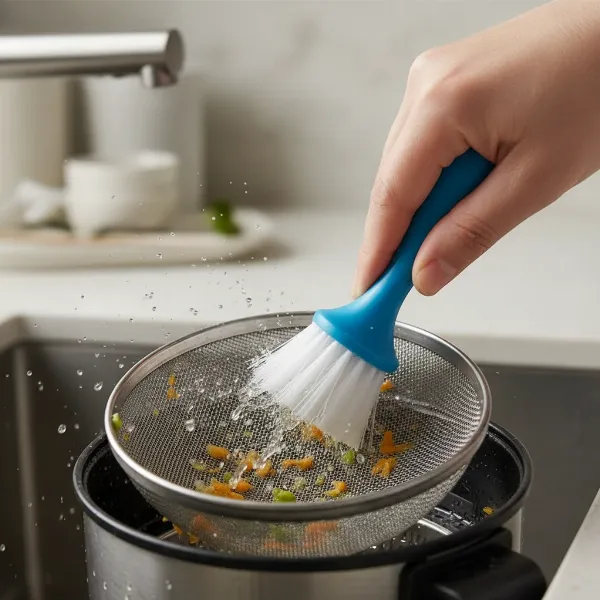 Close-up of a hand scrubbing a juicer mesh filter basket with a specialized brush.
Reassembly: Putting Your Juicer Back Together
Once all parts are thoroughly cleaned, it’s essential to ensure they are completely dry before reassembling. Air-drying on a rack is ideal, as moisture buildup can lead to mold or mildew.
Reassemble your juicer by reversing the disassembly steps. Start with the components closest to the motor base and work your way outwards. Pay attention to alignment marks, arrows, or specific clips that ensure parts fit correctly and securely. For instance, many juicers require the top lid to be locked into place for the motor to operate. Test the juicer briefly (without produce) after reassembly to ensure everything is functioning correctly.
Common Deep Cleaning Mistakes to Avoid
To keep your juicer in top condition, be mindful of these pitfalls:
- Not Unplugging: Always disconnect power before handling parts.
- Using Boiling Water or Drying in Oven: Hot or boiling water can deform plastic parts and damage magnetic sensors in vertical juicers, preventing them from turning on. Avoid drying parts in an oven or on a heater.
- Submerging the Motor Base: Never immerse the motor base in water, as this will damage the electrical components.
- Using Abrasive Cleaners or Scrapers: Harsh chemicals or abrasive scrubbing pads can scratch or damage the plastic and metal components, impairing their function and appearance. Stick to soft brushes and mild cleaners.
- Incomplete Cleaning: Leaving even small amounts of residue, especially in the mesh screen, can lead to pressure buildup and potential damage.
- Forcing Parts: If a part doesn’t easily come off or go back on, don’t force it. Recheck your manual or the alignment; forcing can break delicate plastic clips or components.
Conclusion
Deep cleaning your juicer might seem like a chore, but it’s a fundamental step in maintaining a healthy, efficient, and long-lasting appliance. By understanding the proper disassembly techniques, utilizing the right tools, and avoiding common mistakes, you can ensure your juicer continues to deliver fresh, flavorful, and hygienic juice for years to come. Making deep cleaning a regular part of your kitchen routine safeguards your health and protects your investment. What’s your favorite deep cleaning hack for sparkling juicer parts?
Frequently Asked Questions
How often should I deep clean my juicer?
For optimal hygiene and performance, it’s recommended to deep clean your juicer after every use. While a quick rinse is good, a thorough disassembly and scrub, especially for the mesh filter, prevents residue buildup, mold, and ensures efficient operation.
Can I put juicer parts in the dishwasher?
Some juicer parts are dishwasher-safe, but it’s crucial to check your specific juicer’s user manual first. Parts not explicitly marked as dishwasher-safe can warp or get damaged by the high heat, especially plastic components and delicate seals.
What should I do if my juicer parts are difficult to reassemble?
If parts are not fitting easily, first ensure they are completely dry and check for any remaining pulp or debris that might be obstructing the fit. Then, refer to your juicer’s manual for specific alignment marks or instructions. Never force parts together, as this can cause breakage.
How do I remove stubborn brownish stains from my juicer?
Stubborn brownish stains, often from carrots or other colorful produce, can be tackled with baking soda. Make a paste with baking soda and a little water, apply it to the stain, let it sit for a while, and then scrub with a soft brush. For very persistent stains, soaking in a solution of hot water and 10% lemon juice can also be effective.
Is it safe to use vinegar or baking soda for cleaning juicer parts?
Yes, vinegar and baking soda are safe and effective natural cleaning agents for most juicer parts. Vinegar is excellent for descaling and removing odors, while baking soda is great for scrubbing away stains and absorbing smells. Always rinse thoroughly after use.