Discovering mold in your beloved juicer can be an alarming sight, turning your healthy habit into a potential health hazard. A juicer, with its intricate parts and constant exposure to organic matter, provides an ideal environment for mold to thrive if not properly maintained. But don’t despair! Restoring your juicer to a pristine, hygienic state is entirely achievable with the right approach. This comprehensive guide will walk you through effective sanitization methods and essential preventative measures, ensuring your freshly made juices remain pure and healthy.
Understanding Juicer Mold: Why It Appears and Its Risks
Mold is a type of fungus that flourishes in damp, dark environments with a food source—precisely the conditions often found within a neglected juicer. Residual pulp and moisture left behind after juicing create the perfect breeding ground, allowing mold spores to multiply rapidly. You might spot fuzzy green, black, or white patches clinging to mesh screens, pulp containers, or even hidden nooks within the juicer’s assembly.
Ignoring mold growth is not an option for your health. Consuming juice from a mold-contaminated juicer can lead to various adverse effects, including allergic reactions like sneezing, runny nose, and skin rashes. More concerningly, some molds produce mycotoxins, poisonous substances that can cause more serious health issues, particularly for individuals with compromised immune systems or respiratory conditions. Thorough sanitization is crucial to eliminate these risks and protect your well-being.
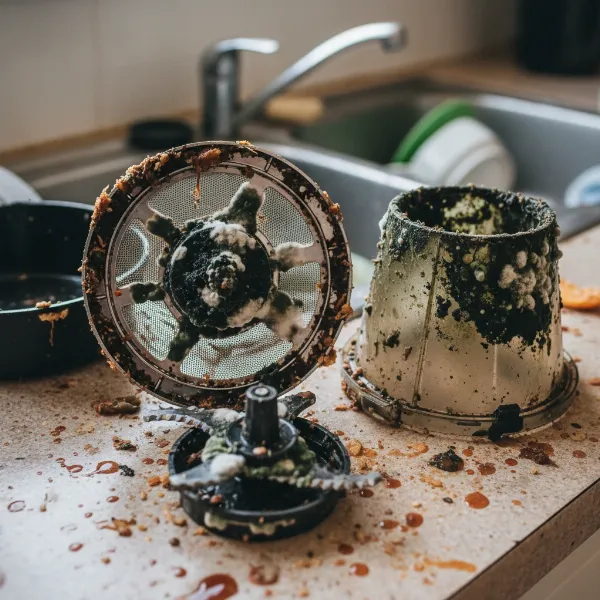 Visible mold patches on disassembled juicer components illustrating the health risks of neglect
Essential Tools for a Mold-Free Juicer
Before you begin the sanitization process, gather the necessary tools and cleaning agents. Opt for natural, non-toxic solutions to protect your juicer’s materials and ensure no harmful residues are left behind.
- White Vinegar: An acidic powerhouse, vinegar effectively breaks down mineral deposits, mold, and bacteria.
- Baking Soda: Known for its mild abrasiveness, baking soda helps scrub away stubborn particles and absorbs odors.
- Citric Acid: A natural alternative to harsh chemicals, citric acid can be used for deep cleaning and stain removal.
- Dish Soap: A gentle dishwashing liquid is essential for initial cleaning and loosening grime.
- Warm Water: For soaking and rinsing.
- Soft-Bristled Cleaning Brushes: A bottle brush, a dedicated juicer brush, and even an old toothbrush are invaluable for reaching crevices and mesh screens without scratching.
- Non-Abrasive Sponge or Microfiber Cloth: For wiping down surfaces and drying.
- Drying Rack or Clean Towels: For air-drying parts thoroughly.
“Regular cleaning is not just about aesthetics; it’s fundamental to extending your juicer’s lifespan and, more importantly, safeguarding your health from potential microbial contamination.”
Step-by-Step Guide to Deep Cleaning Your Moldy Juicer
Follow these steps diligently to effectively eradicate mold and sanitize your juicer.
1. Disassemble Your Juicer Completely
Table is empty.Safety first! Always unplug your juicer from the power outlet before you start disassembling it. Carefully take apart all removable components, including the pusher, lid, feeding chute, filter basket, blade assembly, pulp container, and juice spout. Each part needs individual attention to ensure no hidden mold spores remain.
2. Initial Rinse to Remove Loose Debris
Under warm running water, rinse each disassembled part to remove any visible pulp, fruit fibers, or loose mold. Use your hands or a soft brush to gently clear away as much organic material as possible. This preliminary rinse prevents pulp from drying onto surfaces, which makes subsequent cleaning much easier.
3. Soaking for Deep Penetration
Soaking is a critical step for loosening stubborn mold and sanitizing components. Choose one of these effective solutions:
- White Vinegar Solution: In a basin or sink, mix equal parts white vinegar and warm water. Submerge all juicer parts (excluding the motor base) in this solution. Let them soak for at least 30 minutes, or longer for severe mold issues, even overnight. Vinegar’s acetic acid will work to break down mold and bacteria.
- Baking Soda Solution: For a milder yet effective option, mix 4 tablespoons of baking soda with 16 ounces of lukewarm water. Alternatively, create a more potent solution by combining 1 part white vinegar to 10 parts water, then adding 100 grams (about 7 tablespoons) of baking soda. Soak the parts for at least 30 minutes, ensuring they are fully immersed.
- Citric Acid Solution: For a powerful clean, especially if dealing with mineral deposits alongside mold, soak components in warm water with 100g of citric acid and 100g of baking soda (following a 1:1 ratio if adjusting quantity) overnight. This combination helps lift deep-seated grime and sterilize.
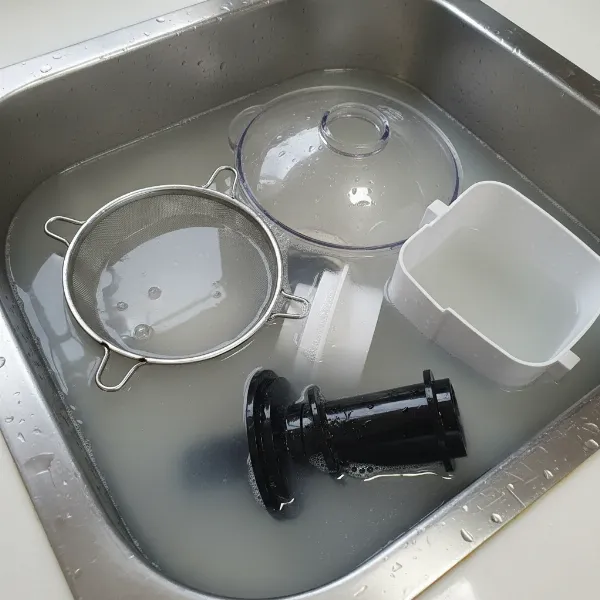 Disassembled juicer parts soaking in a natural cleaning solution for mold removal
4. Thorough Scrubbing
After soaking, it’s time for manual scrubbing.
- Mesh Screens and Blades: These are notorious mold hotspots. Sprinkle a little baking soda directly onto your soft-bristled brush and scrub the mesh screen vigorously under running water. The baking soda acts as a gentle abrasive to dislodge mold and trapped particles without scratching. For blades, use a dedicated brush to safely clean all surfaces.
- Other Components: Use a sponge or bottle brush with dish soap to scrub the lid, pulp container, juice spout, and other plastic parts. Pay close attention to any seams, ridges, or hard-to-reach areas where mold might hide. An old toothbrush is excellent for tackling tight spots.
- Motor Base: Never submerge the motor base in water. Instead, dampen a microfiber cloth with a vinegar-and-water solution and carefully wipe down the exterior. Use a separate dry cloth to ensure no moisture remains.
5. Final Rinse and Inspection
Rinse all cleaned parts thoroughly under hot, clean running water to remove any cleaning solution residue. It’s crucial that no vinegar or baking soda taste lingers, which could affect your next juice. Visually inspect each part for any remaining mold or stains. If you find any, repeat the soaking and scrubbing process.
6. Complete Drying
This step is paramount in preventing future mold growth. Place all cleaned and rinsed juicer components on a drying rack or clean towel. Allow them to air dry completely before reassembling or storing. Any lingering moisture is an open invitation for mold to return. Some experts recommend drying with a microfiber cloth to ensure no watermarks and complete dryness.
Advanced Tips for Stubborn Mold and Stains
Sometimes, mold can leave behind stubborn stains or persist in difficult areas.
- Discoloration: For plastic parts that have discolored from deeply pigmented fruits or vegetables, a soak in a 10% lemon juice solution (or white vinegar) overnight can help restore their appearance while tackling any residual microbes.
- Persistent Spots: If a baking soda scrub isn’t quite enough, consider making a paste of baking soda and a little water. Apply it to the stubborn spot, let it sit for 15-30 minutes, then scrub. For sticky stains, a mix of lemon juice and water can be particularly effective.
Preventing Future Mold Growth in Your Juicer
An ounce of prevention is worth a pound of cure, especially when it comes to mold.
- Clean Immediately After Each Use: The single most effective preventative measure is to clean your juicer right after you finish juicing. Don’t let pulp dry and harden, as this significantly complicates cleaning. A quick rinse of removable parts under lukewarm water within minutes of use can make a huge difference.
- Ensure Thorough Drying: As mentioned, moisture is mold’s best friend. Always allow all juicer components to air dry completely before reassembling or storing them. If you’re in a humid climate, using a fan or dehumidifier in the drying area can help.
- Proper Storage: Store your disassembled juicer parts in a clean, dry, well-ventilated area. Avoid humid or damp environments, such as enclosed cabinets directly above a steamy stove. If storing for an extended period, ensure parts are fully dry and consider storing them slightly apart to allow air circulation.
- Regular Deep Cleaning: Even with daily rinsing, a weekly or bi-weekly deep clean using one of the soaking methods described above will prevent long-term residue buildup and microbial growth.
When to Consider Replacing Juicer Parts (or the Juicer Itself)
While thorough cleaning can revive most juicers, there are instances where replacement might be necessary. If mold has deeply permeated porous plastic components, leaving behind irreversible stains or a persistent musty odor even after aggressive cleaning, it might be time to replace those specific parts. Similarly, if metal parts show signs of rust, especially on blades or mesh, they should be replaced to avoid contamination and ensure optimal performance. In rare cases of extensive damage or if you’re consistently battling severe mold despite diligent cleaning, investing in a new juicer, perhaps one designed for easier cleaning, could be the most practical long-term solution.
Conclusion
A clean juicer is fundamental to a healthy juicing routine. While discovering mold can be unsettling, tackling it with natural, effective cleaning solutions like white vinegar, baking soda, and citric acid can restore your appliance to its hygienic best. Remember the golden rule: immediate cleaning after every use and complete drying are your strongest defenses against mold’s return. By integrating these practices into your kitchen routine, you ensure that every glass of juice you prepare is not only delicious and nutritious but also free from unwanted contaminants. What steps will you take today to ensure your juicer is always sparkling clean?
Frequently Asked Questions
Can mold in my juicer make me sick?
Yes, mold in your juicer can potentially make you sick. Some molds produce mycotoxins which can be harmful, and even non-toxic molds can cause allergic reactions or respiratory issues in sensitive individuals.
What is the most effective natural way to remove mold from a juicer?
White vinegar, baking soda, and citric acid are highly effective natural cleaners for mold. Soaking disassembled juicer parts in a solution of equal parts white vinegar and warm water for at least 30 minutes, followed by scrubbing with baking soda, is a recommended method.
How often should I deep clean my juicer to prevent mold?
While you should rinse your juicer immediately after every use, a deep clean using soaking methods with vinegar, baking soda, or citric acid is recommended weekly or bi-weekly to prevent residue buildup and mold growth.
Is it safe to put juicer parts in the dishwasher after mold exposure?
Always check your juicer’s manufacturer instructions. Some parts might be dishwasher safe, but hand washing with a sanitizing solution is often recommended for a more thorough clean after mold exposure. Ensure parts are completely dry before reassembly.
What are the best practices for storing a juicer to prevent mold?
To prevent mold, store your juicer disassembled in a clean, dry, well-ventilated area. Ensure all parts are completely air-dried before storage, and avoid humid environments to deter mold growth.